Is your Windows displaying “Delayed Write Failed” error while trying to transfer data from external drive to PC or vice-versa? If yes, then it’s likely to get panic as it is one of the serious Windows error. This error message usually signifies that your external drive is being overloaded and can cause data loss anytime. So, why this error occurs and how do you fix windows delayed write failure error.
In this post, I’ll guide you how to deal with this error using 5 different ways. Apart from the solutions, you will get to know each and every info regarding this error.
Free Hard Drive Recovery Tool.
Recover data from USB drives, Pendrives, SSDs, HDDs, and other devices on Windows. Try now!
Something About The Delayed Write
What Does Windows Delayed Write Failed Mean?
Common Causes For USB Delayed Write Failed Windows 10
How To Fix External HDD/USB Delayed Write Failed Error?
- Check The Connection Status
- Free Up PC Storage Space
- Turn OFF Write Caching Feature Through Device Manager
- System Restore Settings
- Run Error-Checking Utility
Recover Data From USB After Fixing USB Delayed Write Failed Windows 10
But before taking any action to fix this problem, let’s know what is delayed write and delayed write failed error.
Something About The Delayed Write:
Generally, Windows uses an exceptional subsystem to perform certain disk tasks that cache the write operations & implement them when a system is an idle.
However, this can enhance the system’s performance and is disabled by default. Hence, this process is called “delayed writing”.
What Does Windows Delayed Write Failed Mean?
Delayed Write Failed is an error message that simply indicates that your external storage drive has been overloaded (mainly with USB/Pendrive/Network connections/ Firewire).
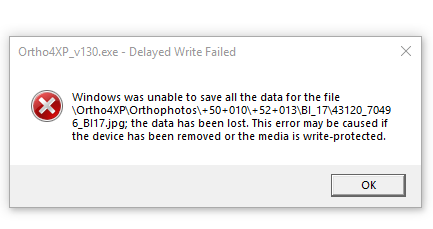
The above-shown error occurs while transferring the files from the external hard disk to PC or vice-versa. Besides, this error could also lead to complete data loss from your external drive or internal disk.
However, this error is related to a Disk Write Caching feature and boosts the Windows performance. But sometimes, it restricts accessing your important files saved within the USB drive. so, it is important to fix this problem ASAP.
Before that, let’s know what actually causes this problem on your Windows computer.
Also Read: Solved: USB Thinks Its A CD Drive!
Common Causes For USB Delayed Write Failed Windows 10:
The hard drive/USB delayed write failed error is perceived when a data storage drive is full or your disk is maintaining a file allocation table.
Apart from that, there are some other reasons as well that can lead to such error, they’re as follows:
- Incorrect cache settings or system restore settings.
- Drive failure or media error.
- Outdated device drivers.
- Drive overheating.
- Due to fault in USB or Firewire host controllers.
- Faulty or unsupported cables.
- Misconfigured BIOS settings.
- Hardware and software failure.
Now, it’s time to follow the step-by-step methods discussed in the next section to troubleshoot delayed write failed external HDD errors.
How To Fix External HDD/USB Delayed Write Failed Error?
Method 1: Check The Connection Status
The first solution that we would like to recommend you is to check the connection status of your USB device.
In order to check & fix the connectivity issue, simply follow the beneath troubleshooting steps:
- Unplug your USB flash drive & insert it back into the PC.
- Try another USB port & check if the issue is solved.
- Connect the USB device to another computer and see if you can copy or transfer the files without receiving any error.
Method 2: Free Up PC Storage Space
As we have already said, the delayed write failed error mainly occurs when a data storage drive is full. Therefore, the second step that you should take is to delete unwanted files and free up some space on the PC.
Even after trying this method, if you still get delayed HDD write failed error then try the next method.
Also Read: How to Fix Can’t Copy Files From USB To PC (2022 Guide)
Method 3: Turn OFF Write Caching Feature Through Device Manager
Since the issue is related to write caching of the storage media, so once you must turn off this feature via Device Manager.
Here is how you can do so:
- At first, g to the Start.
- Then, search for the Device Manager>> click on top result and open it.
- At this time, expand the Disk drives then make a right-tap on your drive that you need to turn off the feature.
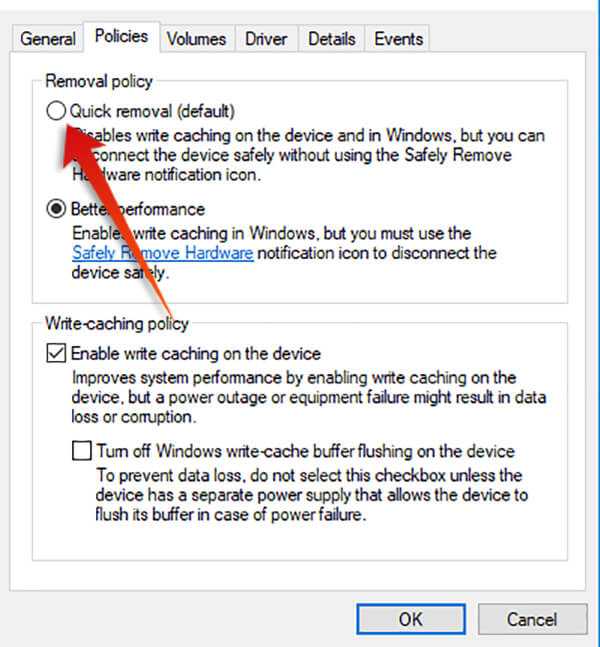
- Now, select Properties and go to Policies
- In a section “Removal policy“, you have to choose the option Quick removal.
- At last tap OK>> then Yes button in order to restart your system (if prompted).
Once you finish these steps, your drive will no longer use system memory as a buffer for storing data and also decrease the device performance.
Also Read: Fix ‘USB Drive Detected But Not Accessible’ Issue
Method 4: Fix Windows Delayed Write Failed via System Restore Settings
Another method that you can try to fix delayed write failed} windows was unable to save all the data for the file is to turn off system restore option. Follow the below steps according to your Windows version:
For Windows 7 Users:
- Firstly, open the Control Panel >> go to System
- Click on the tab “System Restore”, select your removable disk.
- Tap on the Settings button.
- Here, you need to check the box “Turn off System Restore” >> click OK.

- Restart your PC.
For Windows 10 Users:
- Go to the Start then Control Panel.
- After that, click on System If prompt, you have to type your admin password or tap “Continue”.
- At this time, choose the external disk that you need to turn off the system restore in the System protection >> click Configure.
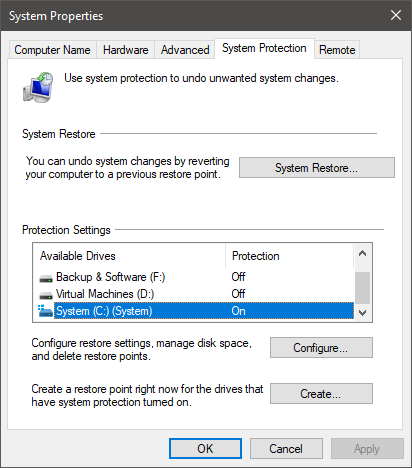
- Under a System Protection for the disk window, check on “Disable system protection” >> “OK” in order to save all changes.
Method 5: Run Error-Checking Utility
Many times, it happens that due to virus attack or bad sectors present in the external drive can cause USB device not reorganized or delayed write failed external HDD.
In such a case, you have to remove the bad sectors present on the drive:
For Windows 7 Users:
- Just connect your USB drive to the system.
- Then go to My Computer>> right-tap on Removable Disk >> Properties.
- Go to Tools tab >> click on the “Check Now” option.

- Here, you will get 2 options “Scan for and attempt recovery of bad sectors” and “Automatically fix file system errors”.
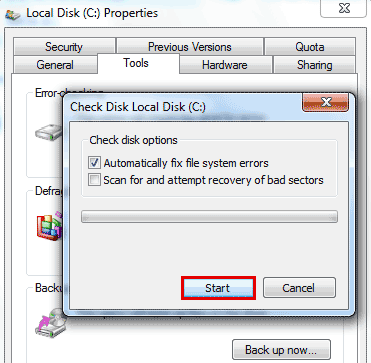
- You need to check both the options >> click “Start”
- Doing so will start the drive scanning process.
For Windows 10 Users:
- Connect USB drive to the Windows 10 PC
- Go to My Computer>> right-tap on a Removable Disk >>Properties
- Tap on Tools tab >> “Rebuild” button.
- Now, the drive scanning process will begin.
- Once, the process completes, you have to click on Close.
Recover Data From USB After Fixing USB Delayed Write Failed Windows 10
After fixing the windows delayed write failure error, if you found that your crucial USB data has been deleted, you should try the world’s best Hard Drive Data Recovery Tool.
It will surely help you to restore/recover deleted or inaccessible photos, videos, and other files from your external storage media without any backup.
With the help of this Pen Drive Data Recovery, you can:
- Recover deleted, lost, missing, or inaccessible data from USB flash drive.
- Retrieve media files from damaged, corrupted, formatted, and virus-infected external hard drives.
- It shows a preview of the recovered media file within the screen.
- 100% read-only program.
- Safe, secure & easy to use.
The program is available for both the Windows & Mac PCs respectively.


* Free version of the program only scans and previews recoverable objects.
This versatile tool also retrieves files from SanDisk, Lexar, Samsung, Toshiba, Sony, Kingston & other Pendrive brands that are available in the market.
As you have known all the outstanding features of this software, what are you waiting for? Just download it on your PC and follow its step-by-step guide to recover data from a USB flash drive.
How To Disable Write Caching Policy Feature?
To disable Write-caching policy feature of the specific hard drive and avoid Windows delayed write failure error, follow the below steps:
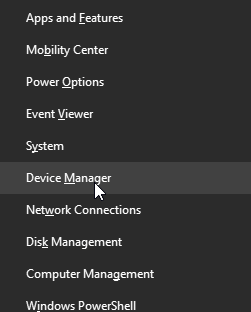
Step 1: Right click on the Start menu then choose Device Manager.
Step 2: Double click on the Disk drives to expand this option

Step 3: Right click on the drive and select Properties.
Step 4: Navigate to the Policies tab then uncheck the box “Enable the write caching on device” in the frame “Write-caching policy”.

Step 5: At last, click the OK button to turn off this feature.
Please NOTE: Disabling a Write caching policy feature will affect your system’s performance & might slow down the system.
How To Avoid External Hard Disk Delayed Write Failed?
However, if you do not want to compromise with your system performance, then follow the below tips and avoid further USB errors:
- Before unplugging or disconnecting your external drive, do not forget to click on the “Eject the USB Mass Storage Drive” option in a Taskbar/File Explorer.
- Check whether you’re using the accurate cable & it is properly connected before transferring or copying the files from the external drive.
- Always make sure to keep your Windows version & device drivers updated.
Also Read: 7 Best Ways To Fix ‘The Directory Name Is Invalid USB’ Error
FAQs [Frequently Asked Questions]
How Do I Fix Failure To Write A File?
You can fix the failure to write a file error by trying these ways:
- Change a File Permissions of the Uploads Directory.
- Empty the Temporary Folder of WordPress.
- Upgrade the Hosting Plan to Create More Disk Space.
How Long Is Windows Delayed Start?
The Windows default delay starts in 2 minutes (120 seconds).
Wrapping Up
Delayed Write Failed is one of the serious Windows error that appears when your external storage device is overloaded. It can occur on due to several reasons.
However, it can be fixed by applying the methods mentioned in this post. All the solutions are easy to apply and will surely help you to fix Windows delayed write failed error without any technical skill.
In case, while solving this error, if you find yourself in a USB data loss situation, try the best Hard Drive Data Recovery Tool. It will surely assist you to get them back in a few simple clicks.

Taposhi is an expert technical writer with 5+ years of experience. Her in-depth knowledge about data recovery and fascination to explore new DIY tools & technologies have helped many. She has a great interest in photography and loves to share photography tips and tricks with others.