External hard drives are used to back up important data, but nothing is more frustrating than when they keep disconnecting. This common problem can disrupt workflows and potentially risk data loss. In this useful post, I will explore the common causes why external hard drive keeps disconnecting and how to fix this issue using the best solutions. So, let’s delve deep into this blog…
Free Hard Drive Data Recovery Tool.
Recover data from USB drives, Pen drives, SSDs, HDDs, and other devices on Windows. Try now!
Causes Of Getting External Hard Drive Disconnects Randomly
Well, the external hard drive gets to connect to the computer via USB cable/port or Thunderbolt. As we all know reading any external hard drive on the system generally involves three major parts; they are the external hard drive, the USB port, and the USB cable, so it is hard to say which part of these goes wrong.
However, the other related factors for getting this error may be:
- USB cable is too old or broken
- USB port is damaged or wobbly
- The external hard drive is corrupted
- Not enough power is supplied in the USB hub
- USB 3.0 driver is incompatible with outdated.
Methods To Fix External Hard Drive Keeps Disconnecting
Fix 1: Try Some Basic Troubleshoot
This error may take place due to some physical problems. It can be like that USB device tends to be faulty or even the USB port you are plugging the device into is still failing. To fix this possibility, you need to follow the steps below:
Step 1: First of all, connect the USB drive to another computer. If you notice that it’s working on another computer then it is clear that the external device is not faulty at all. However, if it keeps disconnecting regularly then you need to move on to the next step.
Step 2: Connect the USB devices to another different USB port to check if this solution fixes the problem. If this fix can fix it, then it is great, and if not then you need to move on to the next method.
Fix 2: Turn Off USB Selective Suspend
Suppose your computer is configured to disable USB devices after some time then you may have the USB devices keep disconnecting issues. In order to make sure that you have disabled the settings, you need to follow the steps:
- You need to press the Windows logo & R on your keyboard simultaneously. Now, you need to type powercfg.cpl and then press Enter key.

- Now, on the selected power option, you have to click on Change plan settings.

- Next, you have to click the option ‘Change advanced power settings’.

- Next, you have to locate and expand USB settings and there you have to select ‘Disabled’ and then click OK.

- Lastly, you have to restart the computer and then check if the USB keeps disconnecting issue has been fixed or not.
Fix 3: Update the USB Driver
If the external hard drive keeps disconnecting when copying files or the USB is not working properly on the computer. It might be possible that you are experiencing this error due to USB 3.0 controller driver issues as listed here:
- The USB driver has an issue with some hardware devices that were connected to its port.
- The external hard drive is outdated and a new driver is available.
- The external hard drive has been corrupted due to the computer being crashed or it is infected by malware.
- The OS of the computer has been upgraded and it results in an incompatibility with the software. Generally, it happens on Windows 7 where a new USB communication protocol was implemented and is said to be USB 2.0.
Well, if any of the above issues are its reasons then it is better to update the USB driver on your Windows as well as Mac computers. Below, you can look at the simple steps to update USB drivers:
#Update USB Driver On Windows Computer
Step 1: First of all, you have to click on the Windows logo and press Window and R keys together to on the Run dialog box.
Step 2: Next, you are required to type there “devmgmt.msc” and then simply press Enter key so that you can go to the Device Manager window.
Step 3: Now, you have to expand the Disk Drives and search the USB drive in the list.
Step 4: If you notice that there is a red or yellow sign indicating a problematic driver or also if you find a kind of “Unknown device” then you have to right-click and then select the option ‘Update Driver software’ and follow the steps to update USB drivers. If you notice that there is a normal sign then you have to only right-click the external hard drive and select there “Uninstall”.
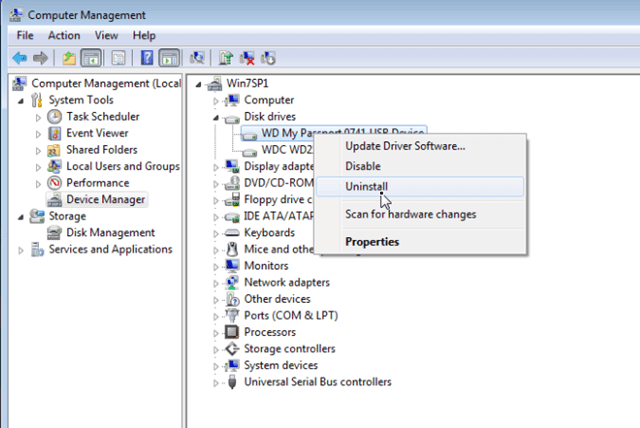
Step 5: Now, you have to restart the Windows system.
#Update USB Driver On Mac Computer
Step 1: For Mac PCs, you have to first click on Launchpad at the Mac Dock.
Step 2: Next, you have to find the App Store in the menu option and then open it.
Step 3: After this, you have to click on “Updates” and then check if there is a new update available. If so, then update the driver as the wizard said.
Fix 4: Change Power Management Settings For USB Root Hubs
Sometimes, your system may turn off automatically the several devices on the system just to avoid its power consumption. However, it can also turn off the USB devices or the external hard drives sometimes and cause the error ‘external hard drive disconnects randomly’. To fix this issue, you have to follow the below steps:
- You have to first press Windows key and R simultaneously and then you have to type there devmgmt.msc and then press Enter key.

- Next, you have to click twice on USB Controllers and then the very first item of USB Root Hub.

- After this, you have to simply click the box before allowing the system to turn off the device in order to save the power whether it is checked or is unchecked.
- Next, you have to click the option ‘OK’.

- You have to repeat this fix for ALL the USB Root Hubs in Device Manager.

- Lastly, you have to reconnect the USB devices to the USB ports and check if they are working properly or not.
Fix 5: Reformat The Drive
Even after trying the above solution, you are still standing with empty hands then don’t worry, try this another solution to resolve external hard drive connecting and disconnecting.
#Reformat External Hard Drive On Windows
In order to reformat the external hard drive on Windows, you need to follow the steps mentioned below:
Step 1: First of all, you have to open ‘This PC/My Computer’ on the desktop and then look for your USB drive in the list shown on the right side and then right-click on it.
Step 2: Now, you have to click on the option ‘Format’ in this context menu and then fill in the file system, volume label and allocation unit size as the Wizard asked.

Step 3: After that, you have to check the ‘Perform a Quick Format’ box and then click “OK” to reformat the hard drive.
#Reformat External Hard Drive On Mac
in order to reformat the external hard drive on Mac, you need to follow the steps mentioned below:
Step 1: First of all, you have to go to the option Launchpad, then Utilities and then Disk Utility.
Step 2: Next, find the external hard drive in the sidebar (left) and then select it. After this, click ‘Erase’ at the top menu of the Disk Utility.
Step 3: After this, you have to fill in the name and then select an option for format for your drive. Next, simply click on the option ‘Format’ to complete the wizard.
Fix 6: Check For External Hard Drive In System Information (Works For Mac)
This solution works in Mac systems only. Sometimes the USB hub doesn’t offer much power to the USB devices and the system will not recognize such a device. In that case, you can check if the preferred hard disk is supplied with enough power in just a few clicks and you will soon get the results. To do so, you need to follow the below steps:
- First of all, you have to click on the Apple logo located at the upper left corner of the desktop.
- Next, you have to choose the About This Mac option and then choose the System Report option where every information about the Mac system is listed.
- After this, you have to click on USB under the Hardware option found on the left side and there you will see the USB devices connected to this Mac.
- Now, you have to search ‘USB external hard drive’ in the list and there you can see the power available for this USB hub and also the required power for the hard drive.
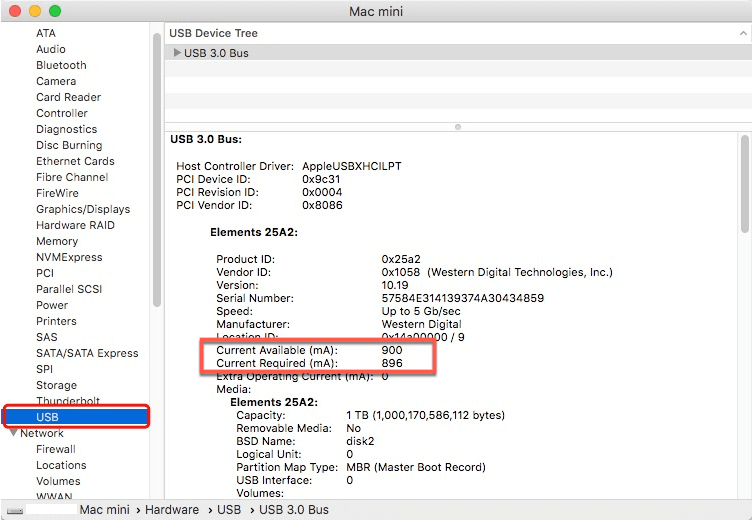
- You can calculate if this external hard drive is consuming too much power from the USB port. Suppose, if the required power is higher than the available power then you need to connect that hard drive to a different USB hub or even eject the unnecessary USB devices.
Fix 7: Disable USB legacy support in BIOS
Last, but not least, you can once consider repairing external hard drive keeps disconnecting by disabling USB legacy support in BIOS. It will work on both PCs having USB 3.0 and USB 2.0 ports. So, to do so, you need to follow the below steps:
- First of all, go to the Device Manager option and then open the target external hard drive under the list of Disk Driver.
- After this, you have to go to the Policies tab and then check Better Performance.
- Check Enable write caching on this device and then finally go to the Save these changes.
I hope, all these fixes will help you resolve USB devices keep disconnecting error. After fixing the issue, you can easily perform external storage data recovery and keep it safe at another place as a backup option.
Ultimate Solution To Recover Data From External Hard Drive
Well, after fixing the external hard drive keeps disconnecting error, it is quite vital to first recover data from external hard drive and for this, you can try the External Hard Drive Recovery Tool. This tool specializes in recovering lost or deleted media files from any kind of digital device, like external hard drives, pen drives, SD cards, CF cards, microSD cards, memory cards,s and more.
This tool can restore lost data from different digital devices on both the operating systems – Windows as well as Mac systems. You can download and install the External Hard Drive Recovery Tool as per your requirement from the below buttons.
emid emid
emid
* Free version of the program only scans and previews recoverable items.
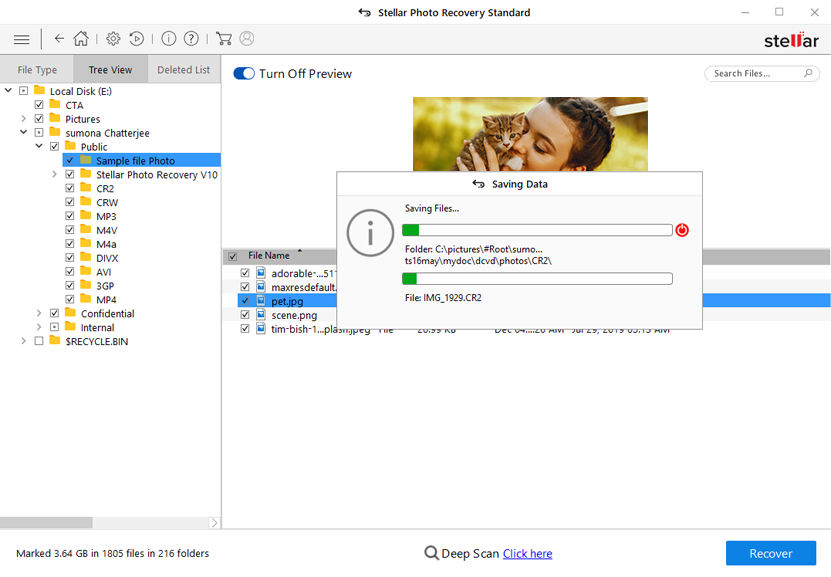
Steps To Recover Lost Media Files From External Hard Drives
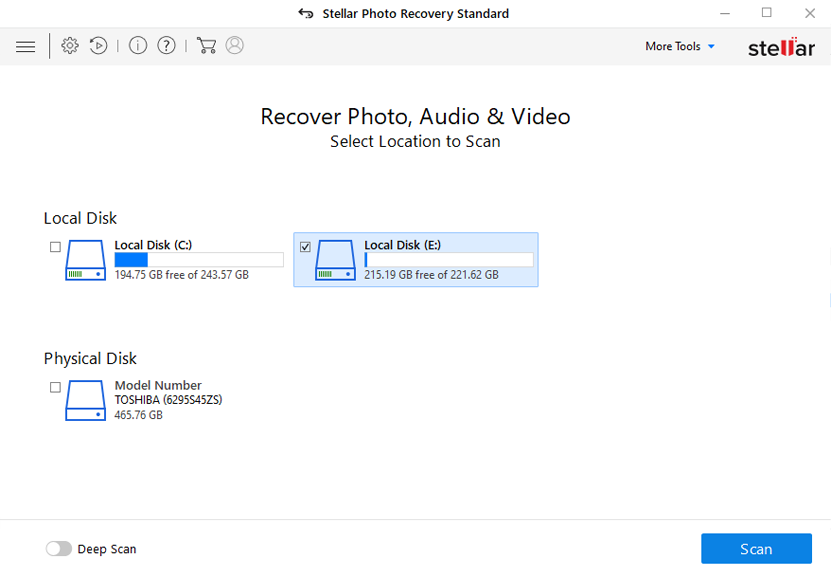
Step 1: Select Desired Location
Firstly, select the drive, external media or volume from which you want to recover deleted media files. After selecting, click on 'Scan'.
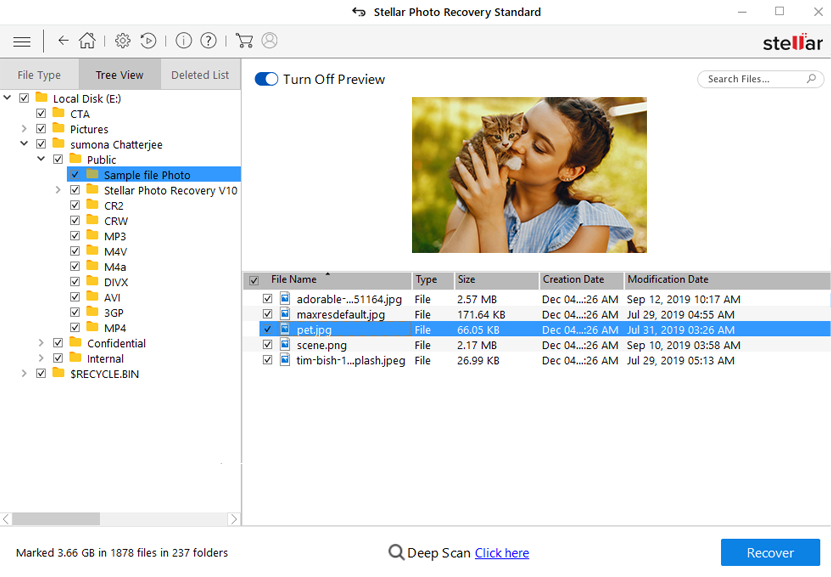
Step 2: Preview Recovered Media Files
Next, you can preview the recoverable media files after the scanning process is completed.
Step 3: Recover Media Files
Lastly, you can select the images, audio, video files you want to restore and click on 'Recover' option to save them at the location you want.
Related FAQs:
Why Does My External Hard Drive Keep Unmounting?
Power fluctuations can mainly cause unexpected unmounting of external hard drives.
What Kills an External Hard Drive?
Power surges and overheating kills an external hard drive.
How to Keep an External Hard Drive Healthy?
To keep an external hard drive healthy, follow these essential tips.
- Maintaining the data cable.
- Refrain from overloading your hard drive device.
- Ensure of a surge protector.
How Do I Stop My External Hard Drive from Turning Off?
To stop external hard drive from turning off, navigate to Power tab then see if a drive is connected to it. If not, then move to the next Root Hub >> click the Power Management tab. After this, uncheck the box that says ‘allow computer to turn off this device to save power’ option.
Bottom Line
External hard drive connecting and disconnecting is a common issue, but it’s usually easy to fix once you identify the root cause. Whether it’s a loose cable, power issue, or outdated software, the solutions are straightforward. However, you can try other workable solutions mentioned in this blog to solve this problem and remain connected and your data safe.

Taposhi is an expert technical writer with 5+ years of experience. Her in-depth knowledge about data recovery and fascination to explore new DIY tools & technologies have helped many. She has a great interest in photography and loves to share photography tips and tricks with others.
