USB drive being a massively popular external hard drive provides a wide array of data storage experiences. However, there are instances where you can be interrupted by “please insert a disk into USB drive error.” It occurs when the operating system cannot recognize or read the USB drive properly. So, in this blog, we provide solutions and insights to fix this error.
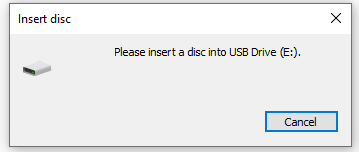
Here’s the screenshot of this error message:
Free Hard Drive Recovery Tool.
Recover data from USB drives, Pendrives, SSDs, HDDs, and other devices on Windows. Try now!
About USB Drive “Please Insert A Disk Into Removable Disk” Error
When you connect the USB to your PC, it displays as a drive, but when you proceed further to open it, it displays a popup message “Please insert a disk into removable disk”.
Many people try to format or partition the USB, but both options do not work at all. Further, when you check the properties it shows up both “free space’ and ‘used’ space’ as 0 bytes.
A user might get this error in different messages such as:
- “Please insert a disk into removable disk no media”
- “USB drive please insert disk error”
- “Please insert a disk into removable disk memory card”
- “flash drive insert disk error”
Now, let’s move on to fix this problem.
How to Fix Please Insert A Disk Into USB Drive Without Losing Data?
You can try these easy ways before spending some pennies on purchasing any tool to fix this issue and recover data from it.
For practical solutions, watch this video:
Solution 1: Insert Removable USB Drive Before Windows Start
Insert the USB drive before starting the windows. Make sure that the USB drive is not set as the priority boot device. It has been seen sometimes that due to USB, Windows hangs a bit during logging on.
If it happens with you as well then remove your USB immediately and insert it again when the Windows starts.
Solution 2: Change The Drive Letter Name
Use the Disk Management to change the drive letter and fix please insert a disk into removable disk error. The steps are as follows:
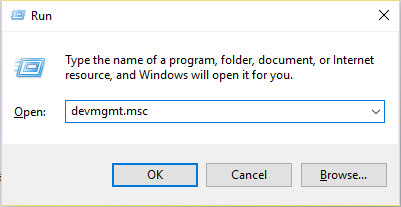
- Press Windows key + R to open “Run”
- Now type “devmgmt. msc” and press Enter.
- You will now see the names of all the drives. Select your USB drive there.
- Right-click on the USB drive click on “Change Drive Letter and Paths” and assign a new drive name to your USB drive.
Now close the setting and check if you can use the USB.
Source Link for Solution 2 & 3: http://answers.microsoft.com/en-us/windows/forum/windows8_1-hardware/usb-please-insert-disk-into-removable-disk/5ec892a8-c5e5-4200-9900-1520ec942887
Solution 3: Try Cooling and Heating the USB Drive
Plug your USB into a PC and with the help of a hairdryer try to heat the USB. Just wait for 1-2 minutes and then remove and plug the USB several times and see if you can access the files stored in it.
If it does not work, then try to cool the USB and again unplug and plug it for some time and check whether your USB is working or not. If it is working then immediately start to copy the files because it might stop working immediately.
Note: This is not a 100% solution, but it works in a few cases.
Solution 4: Update the Windows Drivers
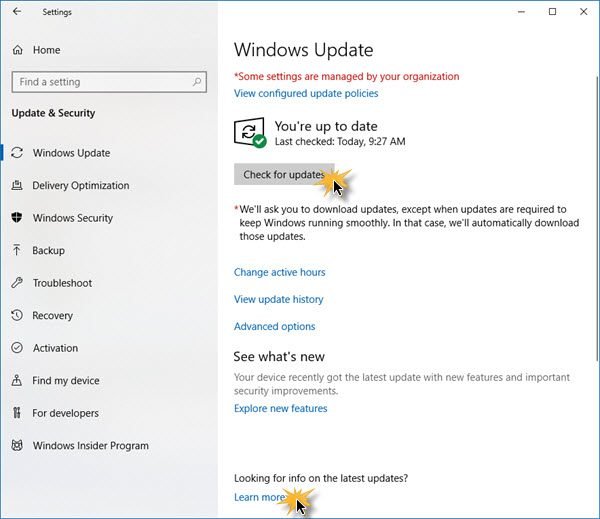
Make sure that your PC drivers are up-to-date. The Windows 10 driver updates are automatically downloaded & installed via Windows Update. For this, go to the Settings >> tap on check for the updates.
Solution 5: Scan for the Hardware Changes
This is another useful method to tackle the situation. Yes, Your Windows PC can effectively scan for the hardware changes. Afterward, it might detect a connected USB drive.
- At first, go to a Search box >> type the Device Manager>> hit enter.
- Under Device Manager, tap on computer image so that it’s highlighted.
- Tap on Action >> click on Scan for the hardware changes.
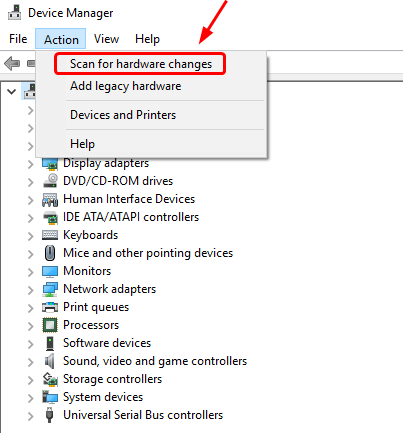
- Now, check if your USB drive is working.
Also Read: Fix “Your Bootable USB Drive Could Not Be Created” Error!
Solution 6: Re-install Drivers
Most of the time, corrupted USB drivers could also lead to a ‘please insert a disk into removable disk’ error in Windows 10/8/7. In such a situation, try to reinstall USB drivers through Device Manager.
- Firstly, right-click on a My Computer or This PC.
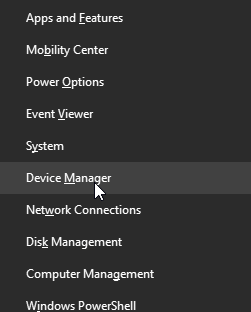
- Then tap on Manage >> Device Manager
- At this time, double-tap on an Universal Serial Bus controllers option.
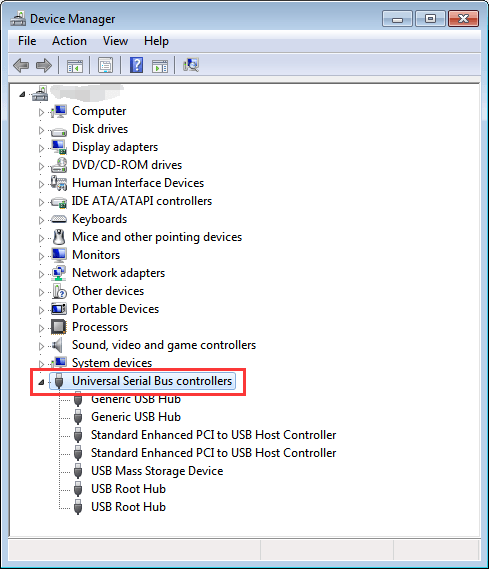
- Here, you’ll get multiple options. Just right-click on a USB driver & choose Uninstall the device.
- Lastly, restart your PC.
Now, USB drivers get automatically installed by Windows. Check if the issue is solved or not.
Solution 7: Repair USB Drive By Formatting
You can use the Disk Management utility to format and repair USB disks.
Here follow the steps:
- First, connect your removable USB drive to your Windows computer.
- On Your PC, click Start and then right-click on “This PC/My Computer” and then select “Manage”.
- On the left side, click on “Disk Management”.
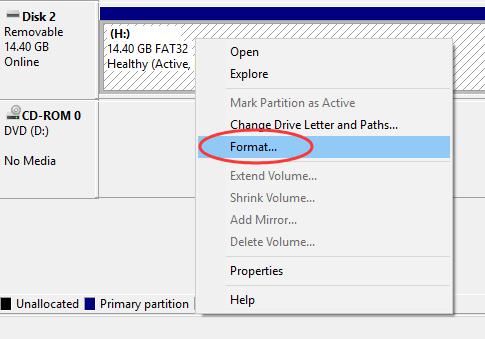
- Now right click on the removable USB drive and click on the “Format” option.
- Perform a quick format.
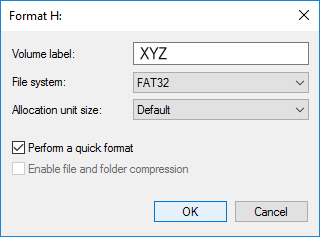
Wait for the format process to get complete.
Note: You may get the following errors:
In that case, you have to first fix those issues before formatting.
Once the process is completed you will now be able to access your USB drive without any problem.
Solution 8: Run Antivirus Virus Scan
Virus/malware infection can result in USB drive malfunctioning. Therefore, you need to run the virus scan for a USB device to remove virus/malware & repair the drive.
Solution 9: How To Fix Please Insert A Disk Into USB Drive Without Losing Data Using Diskpart?
Well, diskpart is a command line that is mainly used to troubleshoot removable disk & drive errors. So, here I would also recommend you to use the diskpart by following the below steps:
- In the Search box, you have to type cmd.
- Next, open the Command Prompt >> select the Run as an Administrator.
- Now, type the below commands one after another and hit enter:
Diskpart
list disk
select the disk N(where N is a USB drive number, present in a table given in the CMD window)
clean
Here, create the partition primary
active
Choose the partition X (where X is a number of the partition)
Format fs=fat32
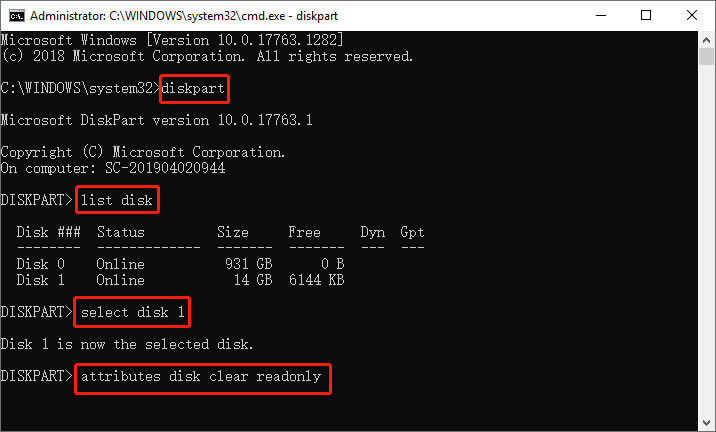
- A selected USB device is totally cleaned & new partition gets created.
- Just close a command window.
- Afterward, restart the computer.
Also Read: FIXED: Error Checking USB Drive Scanning and Repairing Stuck
Solution 10: Use Manufacturer’s Repair Utility
There are USB manufacturer websites that offer their own repair utilities that can help you to fix this error or other known USB issues and problems.
For example, Transcend and HP offer such utilities. These utilities make use of an internet connection and the manufacturer’s proprietary algorithm to fix problems. You will get help from the manufacturer companies and they will guide you with the repair or recovery process.
Recover Data After Fixing ‘Please Insert A Disk Into Removable Disk’ Error (Recommended)
USB Drive Data Recovery Tool is the perfect software that is designed to restore multimedia files such as photos, videos, and audio files from corrupted, faulty, damaged, formatted hard drives and USB drives.
This software comes with an advanced algorithm that deeply scans and rescues files lost due to accidental deletion, virus infection, formatting, corruption, and physical damage to USB drives, memory cards, hard drives, and external drives.
So, download and install the USB Flash Drive Data Recovery tool for Windows/Mac and recover multimedia files from a USB drive that is throwing an error message “please insert disk into USB drive” error.
emid emid
emid
* Free version of the program only scans and previews recoverable items.
Below find out step by step-by-step guide on how to recover multimedia files from USB drive using the software.
Reasons Responsible For This USB Drive Error
The primary reasons behind this error are:
- The drive attempts to get a drive letter which is already reserved or assigned
- Your PC controller is not able to load the USB manufacturer’s firmware and thereby you get this error message under the Device Manager, the USB drive shows up with a confusing name.
- Windows (10, 8, 7, XP, VISTA) is not able to increase the drive and hence you get the error message: drive letter with NO Media
- Or your USB drive might have corrupted due to various factors
So, these are the primary reasons that are responsible for this error message.
Related FAQs:
When I Insert a Flash Drive Nothing Happens?
Even after inserting a flash drive nothing happens, which means you should check all necessary drivers & software are installed in your PC.
Why Is Windows 11 Not Connecting to USB Drive?
Windows 11 not connecting to a USB drive due to outdated or missing drivers, power management settings, or a hardware issue.
What to Do When A USB Drive Is Inserted?
After plugging your USB drive into your PC, you’re ready to copy & move files, rename, or format the drive.
How Do I Allow A USB to Transfer Files?
Connect a USB drive to the computer >> navigate to the folder where you have saved all your files on USB. Then copy those files and paste them to any of the drives (E drive) of your computer.
How Do I Recover Data from A USB Drive That Is Not Recognized?
If you have previously created a backup of your USB drive data somewhere else when it was recognizable, you can recover data from that backup.
Bottom Line
I hope the above-mentioned solutions helped you escape how to fix please insert a disk into USB drive without losing data. Though corrupted/faulty USB drives can always be replaced or fixed, losing important photos and media will never come back.
Hence, it is recommended that you keep a backup of the essential files or try to use the USB Drive Data Recovery tool to deal with such a situation immediately.
Also like and follow us on Facebook, Twitter, and Pinterest to get more related articles or the latest updates.

Taposhi is an expert technical writer with 5+ years of experience. Her in-depth knowledge about data recovery and fascination to explore new DIY tools & technologies have helped many. She has a great interest in photography and loves to share photography tips and tricks with others.